Thursday, March 25, 2010

The fireplace mantle how-to

Here's the blank slate I started with. This was after I tore out part of the old mantle (brick) and then was drywalled. We added furring strips to the fireplace so that we'd have something to attach the drywall to. The hearth was also leveled and straightened with mortar and 2" concrete block. The original hearth was concrete and had sunk and cracked.
This was how it looked before attaching everything. Notice how the cast-iron surround looked before modification.
And here's how it looked after everything was attached. The mantle was a bit out of line and I had to take it apart partially so that I could reattach some of the loose trim. Wasn't too hard. It was attached to the wall with 2 1/2" trim nails from a Paslode cordless trim nailer. If you are doing a lot of trim work, I would highly recommend it. We found ours in eBay many years ago. As you can see the cast-iron surround was modified. Since it was too narrow for the electric fireplace insert, we cut off the sides with a metal cutting saw.
The top of the surround was attached with lots of Liquid Nail. That stuff holds anything! Then I painted the mantle because I didn't want to have to paint around the tile that I was adding next (it turned out I still did because the grout took some of the paint off).

After tiling and grouting the face and hearth, I was getting closer.
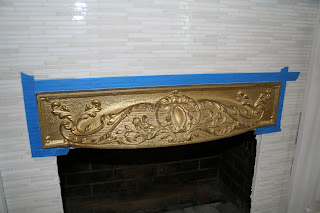
I wanted to change the surround to match the other finishes in our house. Most everything is nickle or silver. I decided to silver leaf instead of just painting. I started by sanding the surface to rough it up some.

This is the leafing I used. I got it at Michael's along with the sizing (used to stick the leafing) for less than $10.00 with my coupon.

I masked off the area I wanted to leaf since I didn't want to get it on the tile or the grout.

 The next step was to put on the sizing. Make sure to get it all over the area you plan to leaf. It just needs to dry a bit until it is no longer wet, just tacky.
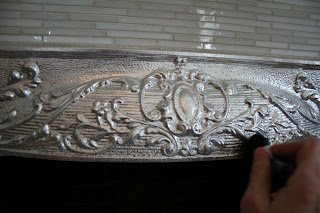
After it is ready to go, just take the leafing and put it on the surface. The leafing that I bought was stuck to the paper. I'm not sure this was the best for this project, because it might have been easier with the detached sheet. Anyway, I just kept putting the sheet over the missing sections on the surround and rubbed with my finger until it was all covered.
To clean off the little bits that stuck up or were not attached, you simply run a soft brush over the surface until done.
After I was happy with the coverage, I had to seal the leafing to protect it and so that it won't tarnish. I used a non-water based sealer.

After that was done, I added trim to the hearth since it sits higher than the floor. We had to scribe it and fit it a couple of times to make sure it was flush. It was also attached with lots of Liquid Nail.

And here is the finished product. I am so happy with how it turned out.


The end of hockey

This was our last week of hockey. Hard to believe that 10 weeks have gone by! And they have improved so much. They can skate forward and backwards and even got to play in two scrimmages. A big thanks to the Penguins and Sidney Crosby. They really enjoyed themselves and got the opportunity to learn a new sport.
Here's a shot from the scrimmage this week. They had 3 games going at once, hence all the kids on the ice. Cade is the taller one in the middle of the photo.

We also had Crazy Hair Day. Cade's class has weekly spirit days, and last week it was time for crazy hair. I put plenty of hairspray on it and spiked it. It didn't last the whole day though. What a cutie.

And then there was this crazy guy. Everything is funny with him. Turning in to quite a character. Mr. Sarcastic.


In other news I got all the painting done in the dining room. I'll post photos once I get the crown moulding up. That is the final part of the project!

I also looked for a new point and shoot camera. I needed something other than my Canon Rebel that I could carry with me all the time. After a lot of research and then finally seeing the camera in person and checking out the features I chose this one:
 Nikon Coolpix S4000 12 MP Digital Camera with 4x Optical Vibration Reduction (VR) Zoom and 3.0-Inch Touch-Panel LCD (Silver)

  It's just been released. I really liked the touch screen and all the features. I'll give a review after I get it.

I've also been reading a lot. I just got this book
The Blythes are Quoted
If you love L.M. Montgomery (author of Anne of Green Gables) you'll love this book. I think it is one of her best. It includes short stories and poems that in some way are related to the Blythes - considered to be the 9th book of the Anne series. This book is a little hard to find in the U.S. because it is a Canadian book, but it is well worth the hunt. I am also reading this one:
Mistress Pat (Children's continuous series)

I just finished Pat of Silverbush last week (yes I am on a L.M. Montgomery marathon). I enjoyed this book -- especially Judy Plum. It makes me think of how my great grandparents would have spoken. Some have said that they thought that Pat was a little flat, but I didn't see it that way.

Now that the dining room is almost done, I may get my tutorial done for how I did the silver leaf on the fireplace.

Friday, March 5, 2010

Completed Living Room

Just so you understand what I started with...here is what the living/tv room used to look like before we renovated. Pretty scary, huh? Love that shag carpet and paneling.
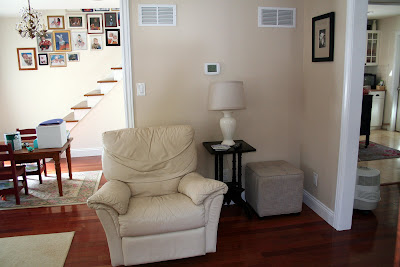
This was the view into the corner of the room and the foyer and stairs. More of the same ugly.
And here is what it looks like now. What do you think? I really love it. I have to point out that we did ALL the work ourselves (I guess that's why it has taken almost 5 years!).
I wanted to redo the fireplace and make it more in keeping with the feel of the house, which was built in the early 1900's. Since the fireplace was so old, it was not safe to use as a wood-burning fireplace. It was totally unlined and much of the mortar was not the best. So I went with the next best thing. I went with an electric insert. We do not have gas service to the house, so this was about the only alternative.
The fireplace mantle was from an 1890's farmhouse in Ohio. I got it at a great price at a local antique store. I went with the marble hearth and the surround is white glass tile in a matchstick pattern. I love how it glitters. And I am glad I went with this size of tile because the larger subway tile was too big for the scale of the area. The hood on the top was from eBay. You can see more about the original here. You might notice that they hood is now silver which matches the other finishes in the house. I will show how I did the silver leafing in another post. And it cost less than $8 to do!

My huge IKEA couch. It is rather big, but we do have 5 people in our family. And even though I have 3 boys I did go with a white couch. The slipcovers are easy to wash and I have 2 sets. I also have a matelasse coverlet across the seat that I can easily throw in the wash and I like the texture. I also change out the pillow covers as the seasons change.


Another view of the couch and foyer. Max loves to lay by the fire and sleep.
The view of the room from the foyer.


Here's that corner again. I'd have to say that it is improved. If you look in the foyer, you can see one of our remaining projects --the railing on the stairs.

Sources: Flooring - Brazilian Cherry, Lumber Liquidators; Wall Paint - Pottery Slip Eggshell, Valspar; Trim - ProClassic Semi-Gloss in White, Sherwin Williams; Glass Matchstick Tile- Oyster, Designer Stone Outlet.

We had to keep pretty much the same footprint as we started with due to support walls, but I think I succeeded in getting more of an open feeling to the house.

I'd love to hear what you think!

Posted by Picasa